3D Printing 01 (PLA): What I Had to Learn Quickly
What I wish I'd known before buying a 3D printer
I bought a 3D printer all of a sudden. I didn't go through a process of wanting one and looking into the subject or anything like that. I just saw them on Amazon and thought "I remember they used to cost thousands" and next day, mine was delivered. I bought it partly because I had things in mind I could design and print (more on that later), but mostly because they are too cool not to have one.
I quickly learned that a 3D printer isn't a gadget you buy, put in your cupboard and bring out to use or show off on a whim. It's not like when we bought those first printer/scanner/copiers and went around saying: "You should see my new printer, it can send and receive faxes. If you need to fax anything, give me a shout". And then, after a couple of years, we'd realise that the only exchange of faxes to have ever occurred was that time we had a day off work to spend in our pyjamas and wanted to make sure our work colleagues knew it.
No, having a 3D printer is an actual hobby in itself. It's more like being one of those guys who has a motorbike lying in bits in their kitchen. It has been a massive, steep learning curve for me over the last couple of months and pretty much everything that could possibly go wrong has gone wrong. I've always joked that my most effective learning method is to mess something up and have to fix it myself but this went beyond being funny.
So far, my 3D printer owning adventures have gone like this:
- In August 2020 I bought a Creality Ender 5 Pro and for a whole week everything I tried to print either failed to even start or else broke off the bed within an hour.
- When the week was up I returned the printer for a refund and ordered an Ender 5 Plus from an official Creality store.
- After two days of owning an Ender 5 Plus, as well as several failures, I'd had the grand total of two successful prints and so I embarked upon The Big One: a Mandalorian helmet that said it would take over 100 hours.
- Four days into the Mando print, I had a power cut that led to the "Z axis incident" that I still don't like to even think about. I then spent a week posting YouTube videos of myself testing various parts of my printer with a voltmeter so that Creality could diagnose the fault.
- Three weeks after "the Incident", to my huge relief, I installed a new main board that fixed the printer.
- By this time I had finished designing my custom PC build parts in FreeCad and was desperate to see if I'd managed to get the measurements right, so I set out to print a nice, wide, flat, square-cornered ATX motherboard plate. Easy, right? I mean, look at the bed adhesion that must have!
- One week of warped prints, broken parts and intense slicer training later there came a magical turning point and suddenly... I'm churning the prints out.
To my own astonishment, I've gone from intensely watching any print that actually makes it past the first layer, to nonchalantly (nay...arrogantly) walking away and leaving my prints to finish in their own time. I've even discovered that my printer puts a "Finish Print" button on the screen when it gets to 100% (but what it actually does I have no idea). Maybe at some point in the future I might be confident enough to be able to say to people: "If you need to 3D print anything, give me a shout". At this point I've learned so much, that I couldn't NOT write an article on this site about the stuff I wish I'd known before I set out.
It turns out, though, that a "what I wish I'd known before I started" list definitely runs into more than one article, so in this first one I'll concentrate on the fundamentals. These are the building blocks that will hopefully help you avoid the weeks of sheer frustration I went through.
The Fundamentals
Buy Spares
Four days into my first major print I had a power cut and, although my printer has a resume function, I started doing silly things when it restarted. Stuff like tugging wires and giving the filament a helpful push in case it had retracted (it promptly snapped in my hand). In my panic I somehow ended up with a completely dead Z-axis, but don't ask me how.
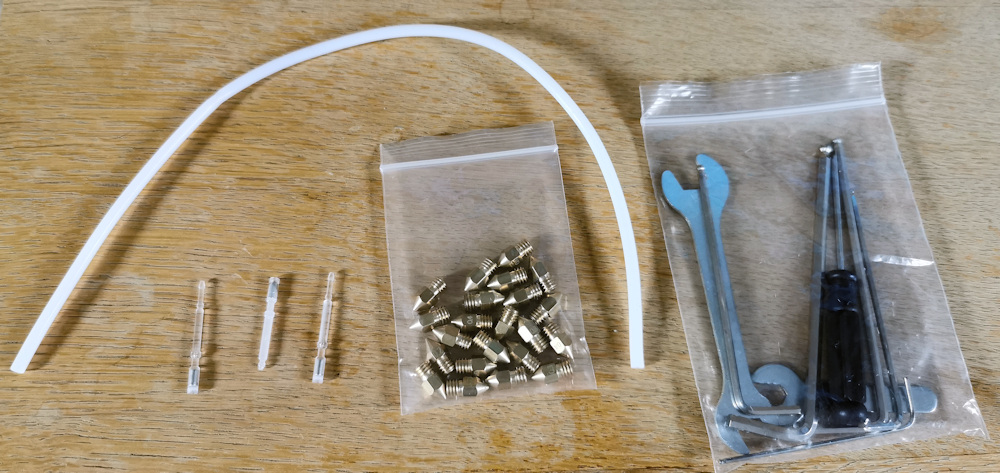
I was absolutely sick. The printer was 6 days old and had come from overseas so I had no idea how I could send it back. I was even closer to tears than my son who had been waiting 4 days for a Mandalorian helmet only to be told the print had stopped. Creality were great though and while following their engineer's testing instructions I came to the realisation that everything on the printer is a replacable module so it was really unlikely I'd be repacking and returning it. The new main board they sent me fixed the printer and also gave me the confidence to order a silent board (not arrived yet). It's hard to describe the noise of a 3D printer sitting on the floor in the room above you at 5:30am. Anyway, the point of the story is to say that you need to think of the printer as a bunch of parts that might need replaced at any time before you can start your next print. There's a reason you get an extensive toolkit with a brand new printer.
Since the board swap I've had to replace the print nozzle, a totally blocked Bowden Tube and a broken sensor needle in the BL Touch bed levelling device (thanks to a badly warped overnight print), so backups of all of those are perpetually on order.
Level, Level and Level again
You need to level the bed. I'll say that again. You need to level the bed. Then treat it as your first go to fix if ever you start having problems again.
It's daunting, complicated and very tempting to just make a token effort and blunder on. That's one of the mistakes I made when I bought my first Ender 5 Pro, failed to print a single item in an entire week and returned the printer for a refund. The Ender 5 Plus I chose instead has the BL Touch leveller, so that at least tried to compensate for my pathetic attempt at a first levelling.
After a few days, I was really watching my Ender 5 Plus in action and noticed that when the print head was doing a long pass from left to right, the Z axis was moving in concert with it. Bringing up the page of bed offsets, I saw that one side of the bed had positive offsets and the other had negative. That shamed me into doing the job properly and I sat and did it over and over and over again, adjusting one corner wheel at a time and watching how it affected the offsets.
The difference was revolutionary. So obvious that it was almost unbelievable. Up until now, my initial layers looked like fish bones. The brims and skirts would be sort of stuck down, but when the main fill started, you could sometimes strum parts of my print like a harp and watch the stuff vibrate. Now suddenly the initial layer had so much of the "squish" the forums all talk about that it actually became a solid layer. And screw holes were round!
So, watch videos, slip that scrap of paper in and out and take your time.
 |
When you get it right, you just think "Aw right! THAT's what it's supposed to look like." I'd go so far as to say that if you touch your first print layer and it's not stuck fast, then stopping the print, levelling the bed again and starting over will save you filament and heartache in the long run. |
Bed Adhesion - Performance Enhancing Substances
Buy a couple of brands of bed adhesive like '3DLAC Plus' or similar. From the start. Right away (for use after your bed is levelled). You may think, as I did, "Why should I?" If I'm printing a photograph on my Epson I'm not expected to polish the photo paper or treat it with sprays. I specifically bought a printer with a glass bed because glass beds are what people who don't have printers with glass beds go out and buy to improve their bed adhesion. If I needed something more, I'd have been supplied it. I mean these things work out the box surely? And what the hell is all this talk of hairspray and glue sticks?
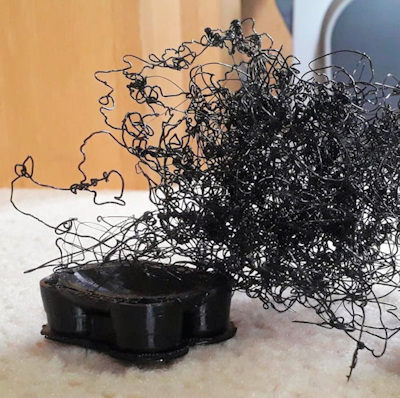
Let me be the one who went through at least £20 of filament and days upon days making toy tumbleweeds. Just trust me that using an adhesive will save you time, money and life expectancy.
And while I'm on the topic of glass beds I'll mention that they go rough side up. I debated this with myself for ages. How can my print stick to something that feels exactly like my favourite non-stick frying pan? Is it not best to use the nice smooth side? Apparently not as it wants bumpy terrain and maximum surface area.
Load Filament Cleanly
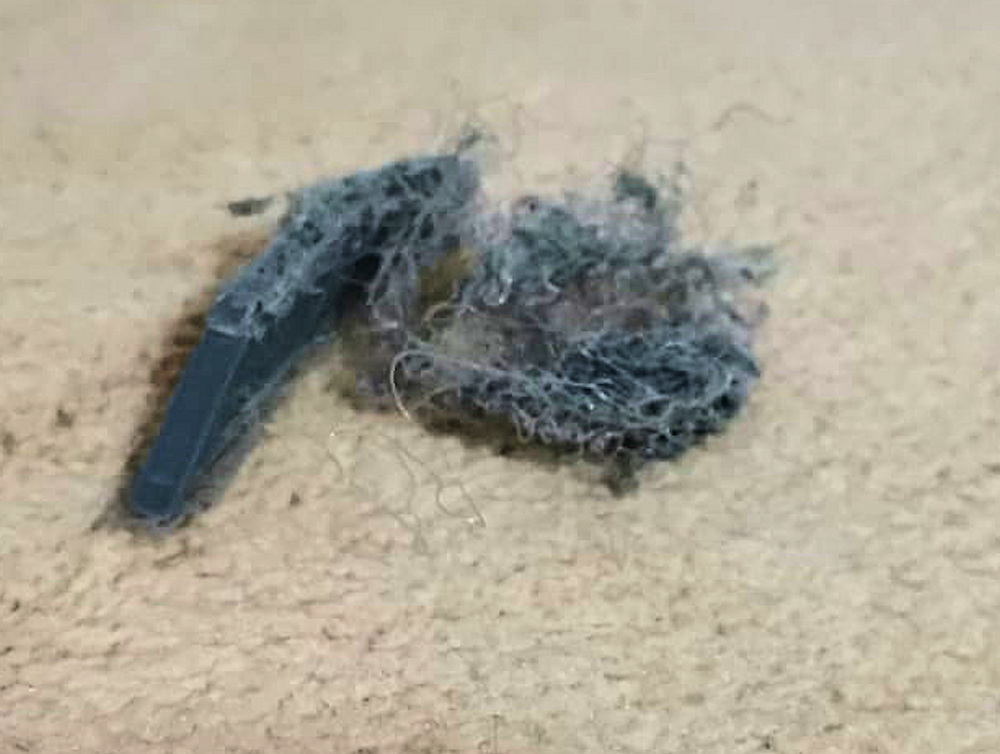
When you open your filament for the first time, unhook the end from its secure hole and go to feed it into your printer, it will wrench itself out of your hand, ping across the room and rattle back into the spool. You should be aware that your PLA was just waiting for this opportunity to tie itself into some sort of clove-hitch-reef-blood-noose. It is virtually guaranteed that your filament has passed under itself and is now caught in a knot that will get tighter and tighter as you print. You are on course to wake up to a print that failed because the filament stopped feeding.
Luckily, before it stopped my print, I noticed this due to some stressed sliding and grinding noises my filament started making. The way I fixed it was to unhook the roll and allow the coil to loosen enough for the filament to start cascading off the side of the spool like Slinky Dog from Toy Story. Eventually it was obvious when the knot was on the floor instead of the roll and at that point I could slowly and carefully wind it back on properly and untie the mess without stopping the printer.
On the Subject of Filament
 All PLA is not created equal, but I think it was, at most, a minor contributer to my problems.
I'll talk about temperatures later, but right now I'll mention that after my ATX board failed again and again, I mulled things over and came to a conclusion that the two prints I'd completed had something in common. They were both from the white sample spool that came with the printer rather than the roll of Eryone Black I'd ordered with my first Ender 5 and had loaded up on the first day. Even my half-finished Mandalorian helmet had started out with the free filament until it ran out and I had to change back to the Eryone.
I tried some different brands and just at the time I turned my failures into successes I was (supposedly) using Sunlu PLA filament (along with my new bed adhesive and finely levelled bed settings). The new brand actually felt different and more plasticky and I did think for a short time that this must be wonderful stuff to be working so well.
However, I've just tried some glow-in-the-dark PLA I bought from China and it seemed determined to regress me back to the beginning. It snapped early on and forced me to take off my Bowden tube. After that the initial layers were pathetic, leading to warping and loss of adhesion within 5 layers. Having learned my lesson, I went through the steps of carefully levelling, cleaning and coating the bed while resisting the urge to whack up the temperatures and mess with settings.
Once again I saw the improvement, but when I got it going the filament snapped again extremely quickly. When I gave up and removed the stuff it managed to snap twice more while I was trying to secure the cut end through the holes in the reel. I feel as though I now know what a bad PLA is, but I think that good bed levelling and adhesion would have won out (if it wasn't for the constant snapping obviously).
Eco Sabotage
When the printer bed cools down you can see and hear the print coming off the bed. The brim changes colour and cracks like ice in a glass. One time when I was present at the detachment of yet another print, I noticed that my Ender 5 Plus's bed was cold. It then registered in my brain that there was a message on my screen saying "Eco mode is on". I can't say if the Ender 5 Pro had this particular feature, but when I switched the Ender 5 Plus Economy Mode to OFF I got my first ever completed print - an XY calibration cube!
I was outraged. Absolutely blazing. Why the hell, when a heated bed was so important to a print clinging on to it, would the default setting of the printer be to just switch it off and let it cool down after a wee while?
I do wonder if this setting just became less important, what with everything I learned about levelling, adhesion and warping (more on that later). I don't really fancy risking it though, and you might want to check it out for yourself.
Your Printer Will Take Every Opportunity to Wind You Up
 If you've ever had a dog that likes to chew stuff, you'll know all about coming home and finding the Sky remote (for example) in a mangled mess. The dog will be looking at you like "You can't blame me, you KNOW I do this sort of stuff and you STILL left us unattended together all day". Meanwhile you can't actually decide who it is you're most angry at. My printer is like that.
Apart from "the Incident" that I wont talk about again, twice now it has decided to just raise the Z axis too far. For no apparent reason and despite having literally JUST used the BL Touch device all over the bed. This leads to the whole nozzle apparatus being forced upwards in a very disconcerting way and a scratched bed if I'm not quick enough at diving across the room screaming "No no no no no". You'll see evidence of that in some of the pictures on this site.
My best guess here is that I really need to switch the printer off and on between prints and hang around at the start of every print. I do this anyway now because if the initial layer doesn't pass inspection I consider just stopping the print.
---
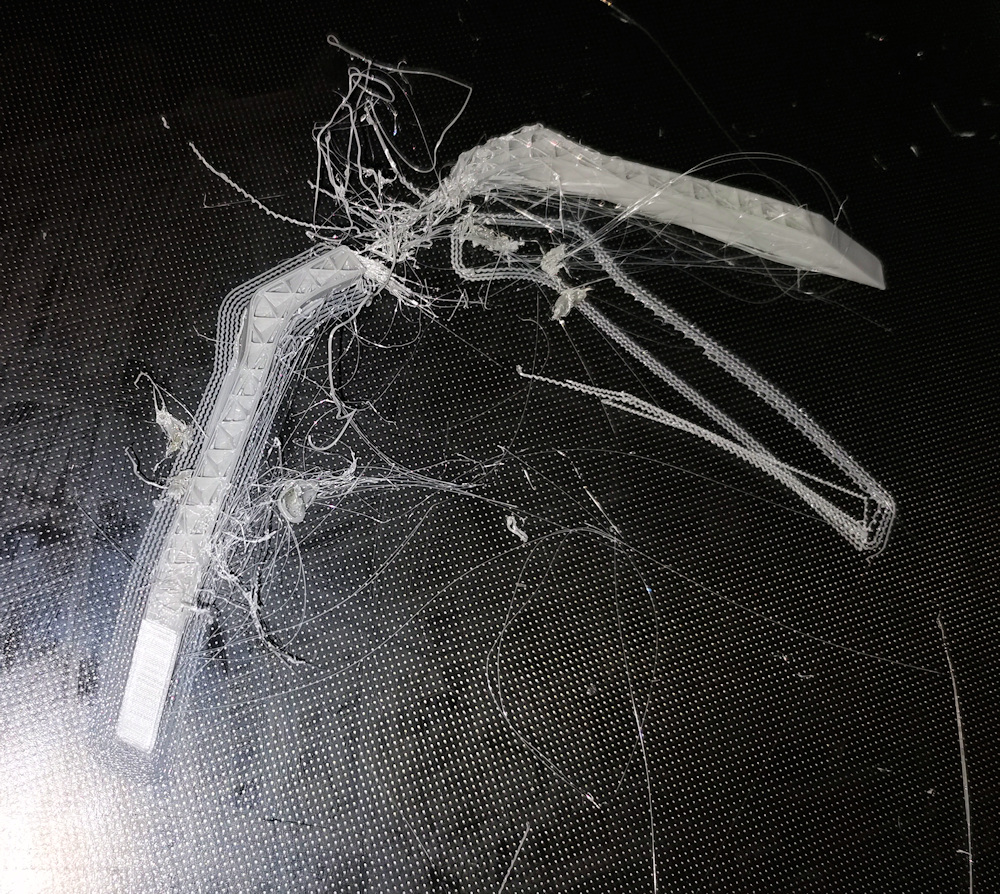
Just when everything was coming good in terms of my bed levelling, bed adhesion, new PLA and sensible settings a new problem arose. Suddenly my prints suffered from stringing with this new Sunlu brand I was trying. I call it stringing because that's the recognised 3D printing term, but really it was more "cocooning"; like a spider had decided to store my print for later consumption. With a bit of clumping thrown in too.
At the time I was attempting a repair for my half-finished Mando helmet but the stringing was so bad that the print was pulled off the bed twice. I checked the Amazon reviews for the filament and was reminded that I'd bought a PLA specifically advertised as low stringing, low temperature PLA, but the only form of branding or labelling mine had was a sticker saying 200-230 degrees, whereas the listing said 190. The first review I read was someone suggesting this was fake filament, so that was me almost convinced enough to complain to Amazon.
Instead, I decided to look at my nozzle as it was just after the bed scratch incident and I suddenly wondered if it was damaged. It was so caked in filament that I had to heat it up and in the process of cleaning it, I noticed it was completely loose. I don't know why that would be. Was it from scraping off the bed? Does it need to be tightened when the heater is on due to having different thermal properties? All I know is the whole heating block under the rubber sock was also covered in filament so now I check it regularly.
The Right Test File
Any gcode file that came with the printer must be the perfect, failsafe test file to demonstrate my new printer, yes?
Er...no. There's rarely a skirt or brim and the print speed seems to be set to 'FTL' from the start. If I hadn't spent a week watching my nozzle dragging a string of filament around the print bed at 100 miles an hour like some sort of souped-up, automatic kitten-amusing machine I'd probably still be the proud owner of an Ender 5 Pro. The problem from my experience is that a premade gcode file can't take into account your particular filament and doesn't seem to consider initial layer speed or similar important settings. Not that I knew any better when I switched my printer on for the very first time.
I'd recommend downloading something like the XYZ Calibration Cube from Thingiverse and using it to give yourself complete control over your first test print.
...and that seems like the perfect segue for Article 2 - Slicer settings.